This is a step by step guide to publish a blog article on Elementor editor. Read and practice the step couple of time and get expert.
A blogging website is all about lots of published blogs. The more you publish new and engaging blogs, the more your blog grows.
I have already guided you on how to write high-quality blogs in my free content writing course and keep them 100% ready in your Google Docs. So, let’s dive further.
In this article, I will guide you on how to draft and publish an article on your WordPress website using the Elementor Editor.
1. Keep Your Article 100% Ready on Google Docs
As a blogging beginner, ensure that your blog is 100% ready in your Google Docs before you start with the drafting and publishing process.
Here’s a quick checklist for Google Docs:
Your blog post title is 7-9 words long
Your blog post title has focus keyphrase
Your featured image is ready
Your article is atleast 700+ words.
The internal and exteral links are inserted
If you are still struggling with Google Docs, read this full guide on Google Docs, and learn how to use it.
2. Add A New Post On WordPress
Log in to WordPress, and go to Posts>Add New Post.
Since, Gutenberg is the default editor of WordPress, hence Guternberg Editor will open up as shown below in the screenshot.
But, Gutenberg is a new editor introduced in place of the Classic editor. Also, it is not as advanced as Elementor or a classic editor. Hence, we will use Elementor along with the default Gutenberg editor.
3. Add Your Title & Slug
Copy your blog post title and paste it in the “Add Title” location in Gutenberg Editor.
Save it as a draft by clicking on the “Save Draft” button on the right-hand side.
Next is slug. Check under the post menu, and click on URL. Set your slug (permalink).
A slug or permalink is the address of your blog post; hence, it’s strictly advised not to change it after publishing the blog post.
Keep your slug short—5–10 words. Don’t use spaces, capital letters, or any special symbol. Don’t use the year 2023 or 2024 in your slug; otherwise, your slug will get outdated after a year.
Changing the slug after publishing will create a 404 error on your website. And that will hurt your SEO.
After entering the blog post title and slug, save it as a draft.
And, finally, click on “Edit With Elementor.“
4. Upload Your Featured Image
Elementor takes 2–3 seconds to open up. Since you have already entered the title, it will appear as per your theme setting.
In this section, let’s upload the featured image.
Go to the bottom left corner and click on the “setting” icon. A side panel opens up on the left side. Scroll to the featured image area.
Upload your featured image to your computer.
To save the draft on Elementor, click on ^ beside the publish button and save it. Reload the page, and you will see your featured image below the title.
5. Uploading Your Paragraph
Your article is mostly paragraphs. So, let’s now learn to upload paragraphs in Elementor.
Go to your Google Docs article file and copy the set of paragraphs. As shown in the below screenshot.
Next, add a new block to your WordPress post. Drag-and-drop text editor element in your newly added block. The text editor will have default text.
Go to the left-side edit panel. Erase the default text and paste your copied set of paragraphs. Clear the format and, add your bold, underline that you wish to add.
Blogs contain several links. These links can be in two formats: a CTA or a simple hyperlink. Hyperlinks are the links inserted over the text.
These links can be of two types: internal links and external links.
Internal links are those that link to the page of your own website, while external links are those that link to pages or posts from other websites.
To add your link, first copy the link to the webpage you want to attach, select the text, enter the shortcut CTRL+K, and paste the link. Enter, and it’s done.
Images are an integral part of blogs. These images can be screenshots, gifs, infographics, or even videos. For example, all these screenshots used in this article are images.
To add your image, add a new block below the paragraph or heading where you want to add your image. Click on the 9 dots on the top, drag-and-drop image.
On the left edit panel, upload the image.
Make sure that your uploaded image is between 100 and 120 kb. Use “compressnow.com” to compress images of higher resolution.
8. Upload Your Headings
Just like paragraphs and images, adding a heading goes the same way. Add a new block, drag and drop the heading element, and paste the heading from Google Docs in the left edit panel.
Based on the hiercarchy of your heading, chage it to H1, H2 or H3.
Sometimes you may not be able to upload the complete article in one sitting. In such cases, do not exit without saving your current progress. Click on the ^ arrow and save it as a draft.
Beside the publish button, there is an eye-shaped icon. Click on it to preview your blog post. You can also use the hide/show button to view your blog directly in Elementor.
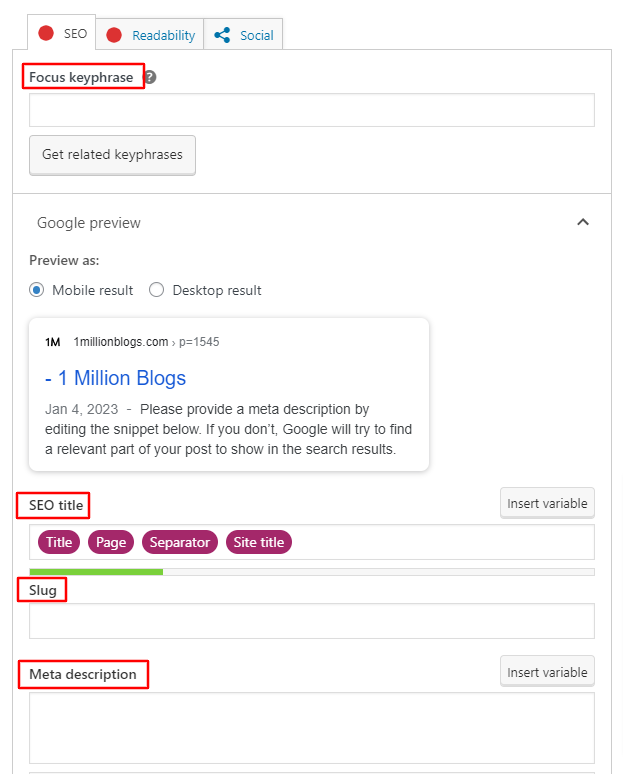
Once your paragraph, heading, images, etc. are drafted, it’s time to do the on-page SEO. We are using the Yoast SEO plugin for it.
We will use Gutenberg instead of Elementor because the Yoast interface, or UI/UX, is a bit complicated to use. So, after saving the draft, exit from the Elementor.
Click on the hamburger icon, and click on the exit button to come out of Elementor.
10. On-page SEO
On-page SEO is very crucial when publishing a blog. It involves adding a focused keyphrase, an SEO title, a meta-description, and a social title and description.
On the right side panel of the Gutenberg editor, check for categories, tags, and other options. Pick a relevant category for your blog, add a few relevant tags, and write a short, 15-20-word excerpt.
Double-check everything once again.
Next, we will proceed to schedule or publish it.
12. Schedule/Publish Your Blog
You can publish your blog post either on Elementor or on Gutenberg. Both editors allow it.
If you want to make it live instantly, click on the “Publish” button.
In order to schedule it, click on “Immediately” and set the time, AM/PM, and date. Click on the schedule button.
End Notes
These 12 steps may look complicated in the first reading. But, as you practice it a couple of times, drafting an article and publishing it will be a matter of 15-20 minutes.
One last note: do not publish until your blog is 100% drafted on WordPress.
If you are still facing issues, reach out to me, and I will personally help you with 1:1 sessions.


Thankyou so much
This is very helpful post